Purpose: The "Nail Knot" is the best way to attach the leader butt to the front/tip of the fly line. (It may also be used to tie the backing to the fly line as an alternative to the "Nail-less Knot").
Step
1:
Lay the
fly line to the left & the leader to the right. Place a
"nail" (or any elongated
object approximately the same diameter as the fly line) atop the fly line
(we're using a needle here); form a loop in the
butt end of the leader, leaving about
5" of tag end to tie with; lay this loop on top of the "nail";
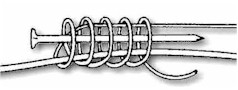
Step 2: Pinch the fly line, “nail” and left side of the leader loop with your left hand; with your right hand, wrap the tag end of the leader butt around the fly line, the "nail" and itself 5 times; as each wrap is made, keep them pinched together tightly in your left hand;
Step 3: Using your right hand, take the leader butt tag end and run it back underneath the loops (in this case, we've inserted the leader through the eye of the needle and then pull the needle out to the left.) Keep the loops from overlapping;
Step 4: While continuing to control the wraps with your left hand, remove the "nail" with your right hand by pulling it out to the left (to the fly line side)

Step 5: Do not let go with your left hand. Tighten the knot by carefully pulling alternately on the leading end and tag ends of the leader to snug it up against the fly line. Again, try to keep the wraps of the knot from overlapping;
![]()
You will use this knot, so work on it. There are alternatives to using this or other knots to attach your leader to fly lines; see "Slip-on leader butts" in the glossary, or go to Slip On Leaders.
To review a different way to tie this knot, go to Alternate Nail Knot.
Previous: Duncan knot / Next: Nail-less knot